How to Build a Minimalist Acoustic Panel at Home: A Step-by-Step Guide
When it comes to improving the sound quality in your home, acoustic panels are the last thing you need to think about. However, with the skyrocketing cost of professional acoustic panels, many DIY enthusiasts are turning to the world of DIY acoustic panels as an affordable alternative. In this article, we'll walk you through the process of building a minimalist acoustic panel at home, explain how to choose the right materials, and provide you with a step-by-step guide to create your own DIY acoustic panel.
The first step in building a minimalist acoustic panel is to choose the right material for your absorption material and the frame. For the absorption material, you'll want to choose a material with a high NRC (Noise Reduction Coefficient) rating. Some popular options for absorption material include:
- Acoustic Fleece: A popular choice for DIY acoustic panels due to its affordability and ease of use. Acoustic fleece is a type of fabric specifically designed for sound absorption.
- Open-cell Foam: A popular choice for acoustic panels due to its high NRC rating and ease of use.
- Wool: A natural, eco-friendly option for acoustic panels that offers excellent sound absorption properties.
Designing the Frame
Once you've chosen your absorption material, it's time to design the frame. You can choose between a variety of frame styles, including:
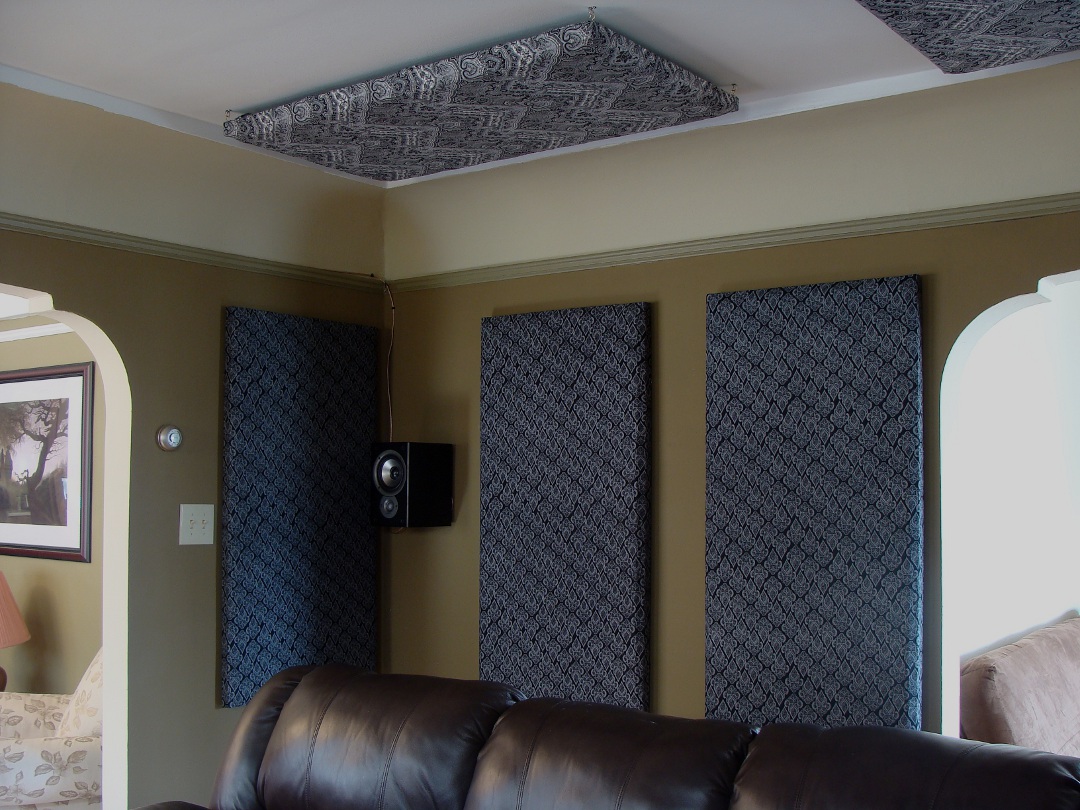
- Modular Frame: A frame made from modular panels that can be easily disassembled and rearranged.
- Simple Frame: A basic frame made from a single piece of wood or PVC.
Step-by-Step Guide to Building a Minimalist Acoustic Panel
Now that you've chosen your absorption material and frame design, it's time to start building. Follow these steps:
- Measure Your Space: Measure the space where you plan to install your acoustic panel to determine the correct size and positioning.
- Cut the Frame: Cut the frame material to the required size using a saw or a cutting tool.
- Attach the Absorption Material: Attach the absorption material to the back of the frame using glue or staples.
- Attach the Fabric or Covering: Attach a fabric or covering to the back and front of the frame to complete the aesthetic.
- : Install your DIY acoustic panel in the desired location, making sure to position it correctly to achieve the best sound absorption.
Why DIY Acoustic Panels?
This particular example perfectly highlights why How To Build A Minimalist Acoustic Panel At Home is so captivating.
DIY acoustic panels offer a number of benefits, including:
- Cost-Effectiveness: DIY acoustic panels can be made for a fraction of the cost of professional acoustic panels.
- Customization**: With DIY acoustic panels, you can choose the materials and design that fit your unique needs and style.
- Environmental Sustainability**: DIY acoustic panels can be made from eco-friendly materials, reducing waste and minimizing your carbon footprint.
Conclusion
Building a minimalist acoustic panel at home is a fun and rewarding DIY project that can improve the sound quality in your home. With the right materials, tools, and a little creative vision, you can create a high-quality acoustic panel that complements your unique space and style. So why not give it a try?
Additional Resources
- Jesco Lohan's Acoustic Insider for an in-depth look at acoustics and how to improve your room's sound quality.
- Iris Lee Gallery for sound-absorbing modern abstracts and acoustic wall art panels.
- The Home Depot for a variety of materials and tools needed for your DIY acoustic panel project.


")


 - acousticsfreq.com")

 - Instructables")

 - Quiet Home Life")
